
5th gear locking ping bushing
[ Home ]
A common problem on the Z3 M Coupe is that after selecting 5th gear, the gear lever fails to return to its normal position below 3rd gear. The problem is usually worse when cold. The cause is a defective coating on the bushing for the 5th gear locking pin, which causes the pin to stick in the bushing. BMW issued a repair kit that fixes the issue by replacing the bushing. Googling for "Gear lever sticks in 5th/reverse gear shift gate" should turn up a copy the service instruction. The repair kit itself costs all of £3 from a dealer, but replacing it is a fairly big job as it requires the transmission to be removed from the car.
There's a ton of information on the issue on this Bimmerforums thread which has been running for over seven years at time of writing. There are some good guides on dropping the transmission on an E36 on the Pelican Parts website, and most of it is applicable to the M Coupe. A copy of the BMW TIS is also handy...
In addition the the repair kit, the TIS advises replacing the locking nuts on the flex disc. You may wish to replace the flex disc itself while you're at it.
| Part | Qty | Part # |
|---|---|---|
| Repair kit | 2-3 | 23 11 7542726 |
| Locking nuts | 3 or 6 | 07 12 9900047 |
| Flex disc | 1 | 26 11 2226527 |
You actually only need one kit if you're doing 5th and two if you're doing reverse as well, but at £3 each, it makes sense to have a spare.
If you're not replacing the flex disc, you only need to undo three of the six bolts.
Predictably, the TIS specifies the use of BMW special tools at every stage, and as usual, most of these can be trivially improvised. The one tool that does need some thought is the special tool used to drive the new bushing into the gearbox. Various people on the thread linked above report success using a socket of the right size, although others report damage to the bushing using this method. The BMW special tools also make it trivial to push the bearing in to the correct depth.
As the tool is really just a bit of metal rod turned down to the right dimensions, it's easy enough to make your own tool if you have access to a lathe and the relevant dimensions (see below).
In order to get the gearbox out, you'll need a set of external torx sockets (E10, E12 and E14), and a decent array of extensions. 3/8" universal joints and extensions are particularly handy as there's very little clearance around some of the bolts.
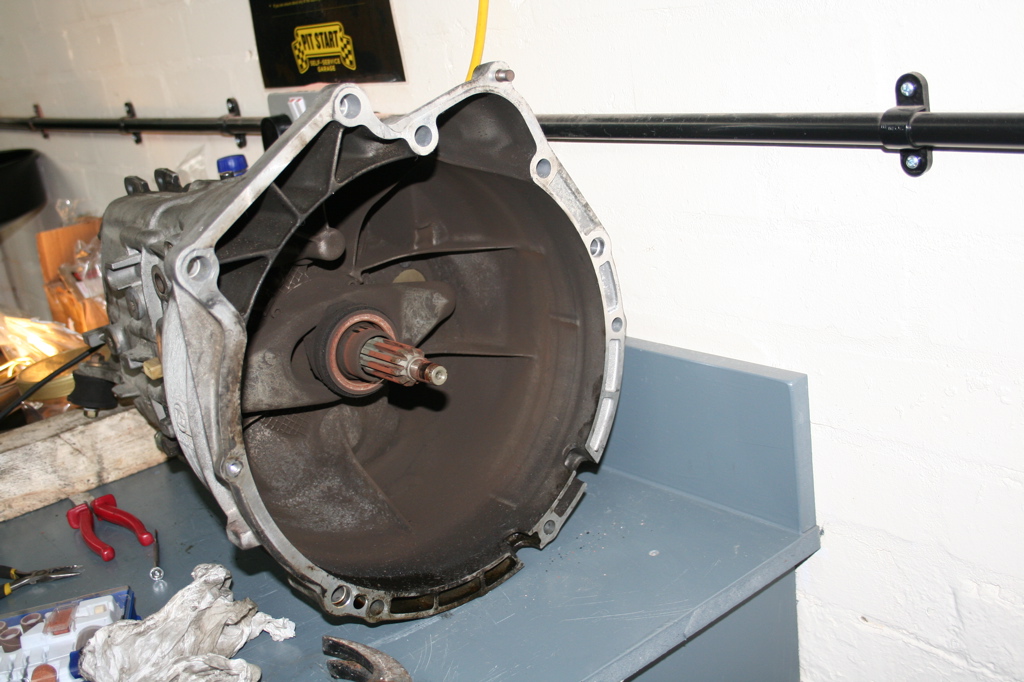
This is relatively straightforward, but there are few things that could waste some time. The first of these is the pin that holds the upper selector rod to the gearbox. It's actually fairly easy to get out but it's very hard to see how this works while it's still in position. The pin has a clip that that presses onto a plate on the gearbox. This needs to be prised up, and the pin will then slide out. In order to prise it up, you need to push the inner plate of the clip inwards as it has a "tooth" on it (just visible in the photo below) that catches on an indent in the gearbox. This requires two screwdrivers: one to lever the inner plate inwards, and the other to prize the clip upwards.
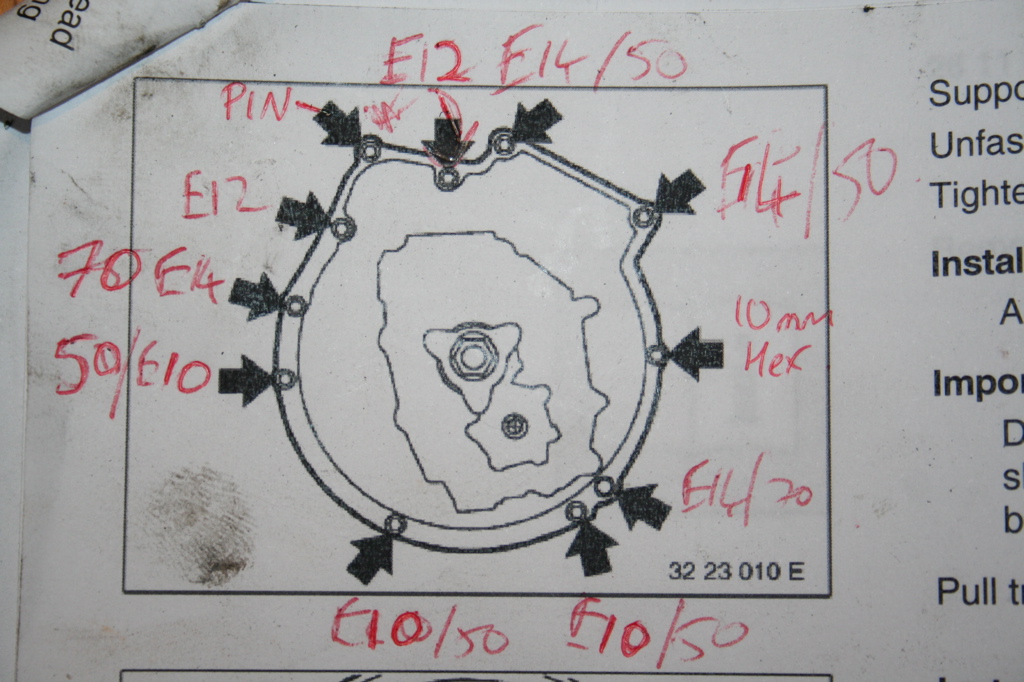
The TIS shows the positions of what should be all of the bolts holding gearbox in place. There are two things to watch out for. Firstly, one of them is a hex bolt that bolts in from the front of the gearbox and only serves to hold the metal plate between gearbox and engine so it's easy to miss. Secondly, the top left position marked is in fact a locating pin for the starter. In my case, this pin was pretty solidly ceased and getting the starter separated was almost impossible - to the point that I was convinced that it had to be a bolt of some kind. The diagram below shows the locations of the bolts and pin, and along with the type and length of each bolt.
When reassembling the gearbox, the starter can be a pain. You need to carefully position the starter so that the metal gasket will sit flat on the back face of the engine, get the gearbox bolted on and the reattach the starter (having cleaned the pin on the gearbox first).
When the gearbox is removed from the engine, the engine will fall forwards on the remaining mounts. To prevent this support the front part of the sump with either a jack or exhaust stand, or wedge a piece of wood between the sub frame, anti-roll bar and the sump.
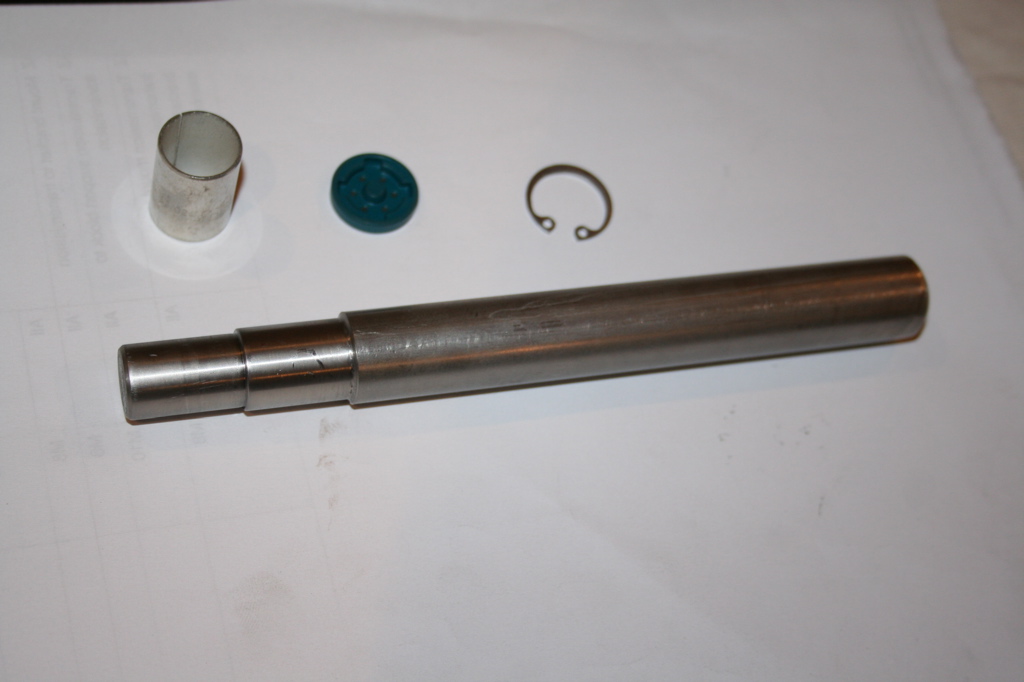
On paper, the fix is simple: remove sealing cap, spring and locking pin. Swap out the bushing and reassemble. In practice, it's a little more involved:
Use circlip pliers to remove the circlip. It's important not to damage the bore when removing the old sealing cap so as not to destroy the seal of the new part. I found that pressing down firmly on one side of the cap rotated it to the point where I could grab the other side with pliers.
This will remove itself.
If this pin moved easily, you wouldn't be doing this fix. The pin has a hole in the end, and the standard approach seems to be to insert a screw a few turns into the hole and pull it out but I couldn't get a screw to grab it. Instead, I first got the pin moving reasonably freely by heating it up with a heat gun, then cycling it repeatedly by turning the selector rod and then pusing it back in. I then used some expanding circlip pliers to grip the inside of the hollow pin and it came out with a bit of a twist and a pull.
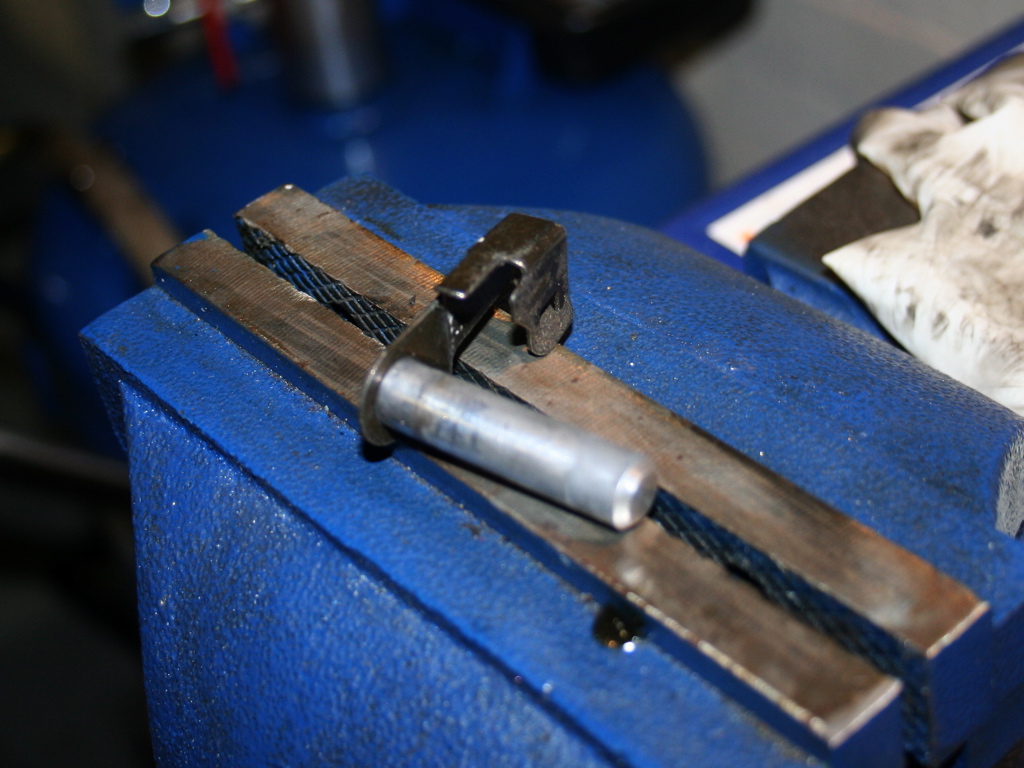
The service instruction specifies that this needs to be removed without damaging the bore it's sitting in. Good luck with that. I quickly resigned myself to the reality that some scoring was unavoidable. As you will see from the new part, the bushing is just a rolled piece of metal and has a seam running along its length. To get the old one out, you need to force it inwards at this point. I did this by driving a small screwdriver under the bushing along the length of the seam. I wasted some time trying to further roll the lifted edge of the bushing and pull it out with pliers, but in fact the important thing is to get the seam separated along its entire length. Once I did this, it came out pretty easily.
If you don't have the BMW tools for bushing insertion, it's a good idea to measure the depth of the bushing prior to removal. I measured it as 12.75mm below the outside of the gearbox.
I cleaned up the burrs made in the process of removing the old bushing, and then drove in the new on using a the custom tool (see below) taking care to get it to the correct depth. The tool I used worked well, and did not visibly damage the lip of the new bushing.
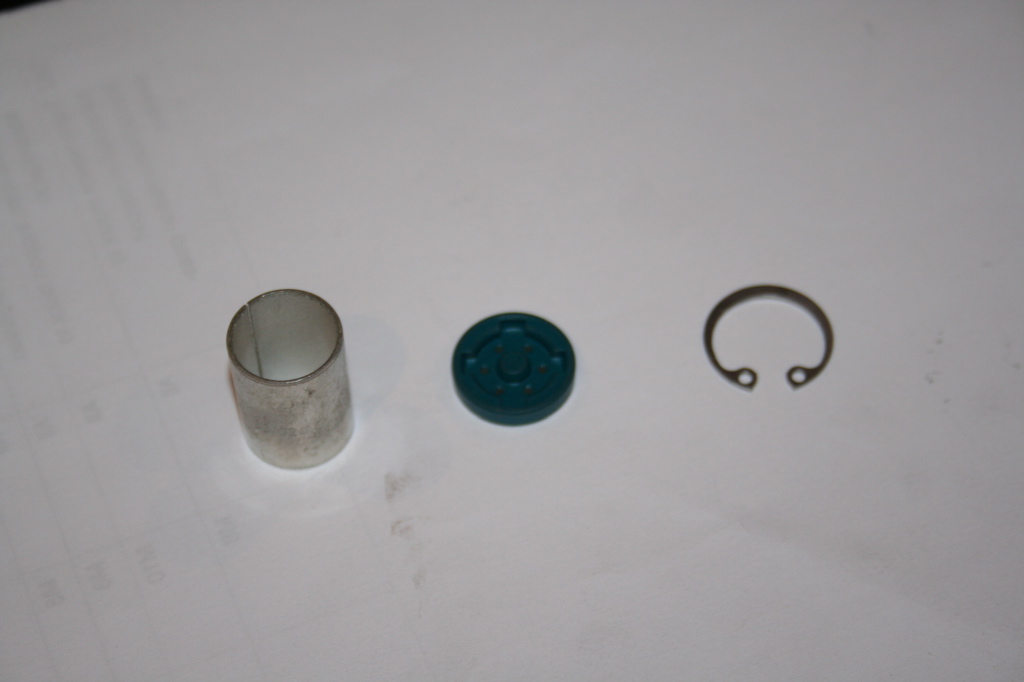
The locking pin needs to go in with the slanted end facing upwards. Push the sealing cap in with the end of the bearing tool, then start the circlip, then push that in with the tool.
The tool required for inserting bearings is simply a metal rod with sections of three different diameters. The first fits inside the bushing to locate it when inserting. The second is wide enough to press the lip of the bushing, but not wider than the bushing itself. The third is wider than the bore hole on the outside of the gear box and ensures that the bearing is inserted to the correct depth.
Most of the necessary dimensions can be taken from a new bushing. The insertion depth can be measured from the gearbox, but as I needed to get a tool made before dropping the gearbox, I made the second section much longer than necessary, and took care to get the bushing to the right depth.
I measured the dimensions as follows:
| Length of bushing | 25mm |
| i/d of bushing | 16.18mm |
| o/d of bushing | 18.07mm |
| Depth of bushing from face of gearbox | 12.75mm |
The diameters of the tool should be slightly smaller (say 0.25mm) smaller than these dimensions.


Paul Warren 10:03:10 23-Dec-2014